


Holographic Mograph Animation Tutorial in Cinema 4D
In the past, I have created various holographic applications with great pleasure. Either projected or using devices such as the Dreamoc. Today, technically speaking, you still can't do what you really want; build a real interactive holographic app. And if you can't make it, fake it. Just because it's possible - and to play around. Mixing reality and fiction is also a passion of mine, and when a wall image of tennis star Serena Williams had just been rejected, she formed the basis of an interactive holographic idea that came to mind - based entirely on the Mograph module of Cinema 4D.
A nice fact is that the initial designer and developer of Mograph, Per-Anders Edwards, recently won a Sci Tech Award for his module. Quite right, because Mograph forms the basis for many cool motion graphic animations out there.
Holographic Animations in Mograph | What to pay attention to
I shot a video by hand with my Smartphone. Of course, it would have been wiser to shoot a film in a professional setting, but for testing purposes, it was good enough.
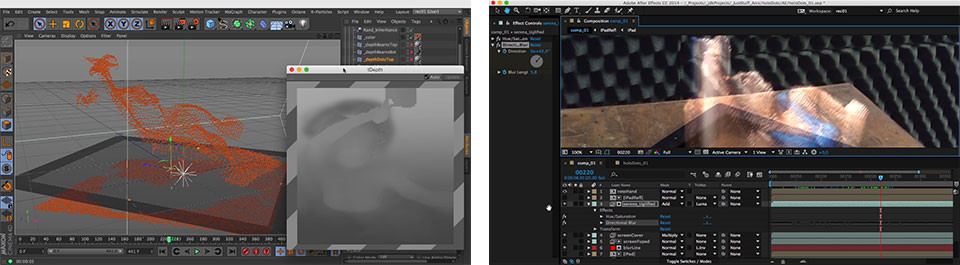
Tip: Due to the low quality of the source file, after the pre-render from Cinema 4D, I applied several filters in AfterEffects to make it less attractive - and therefore more credible. Razor-sharp renders over blurred backgrounds do not benefit credibility.
Holographic Animations in Mograph | results in 6 steps
A lot of steps were needed to reach the end result. Below the- 6 basic steps with a few tips. For the sake of convenience, I omit the logical steps. For example, you must have footage, and you must have a clear view of the result. You simply cannot create anything if you do not know what it should be.
Step 1: Motion Tracking
It seems almost too simple, but always first analyze where your camera is within the 3D environment by taking your footage through the Motion Tracking system. Without this step, it is practically impossible to mix 3D elements with moving 2D images. For the best tracking results, do not forget to remove extra moving elements - like the hand - with a mask from your camera tracker results.
Step 2: Modelling
Build a few simple 3D shapes such as a "plane" for the table to catch shadows and the shape of an iPad with a screen to place your clones onto. If you look through your solved 3D camera, you’ll see exactly how and whether they match your background footage. View your scene on various frames from your timeline to check for consistency. These shapes also offer the opportunity to render the correct luma maps for the post-production using object buffers.
Step 3: Cloner Setup & Depth Map
Make Mograph selections for the clones you want to animate up or down. A depth map forms the basis for the final shape of Serena. The easiest way is to prepare this in photoshop and later fine-tune in Bodypaint if desired. The advantage of using Bodypaint is that you can instantly see the results of your brush strokes in your shader effectors - through your material.
Step 4: Effector Integration & Xpresso
Only expand your cloner setup if you know the basics are right. In this case, I used three cloner variants and various effectors to animate the whole. Thanks to the use of Xpresso, you can automate a large part. Do not animate everything by hand if you can prevent a lot of manual work with a few simple Xpresso nodes.
Step 5: Renders in C4D
Render your scene from Cinema 4D with at least the beauty pass and a number of object buffers. Given the large number of clones with transparency, it was necessary in this case to set the Ray depth to a maximum of 500 in the render settings. A small tip is the extra rendering of the clones shadow pass on the table. Even though it is hardly visible, it is the small things that contribute to the final credibility.
Step 6: Post in AfterEffects
The most important part in AfterEffects was adjusting the "directional blur" of the renders to the jerky Smartphone footage. Partly due to this adjustment and some extra filters to make the hologram of Serena less attractive, the final render was well balanced. A small tip when placing keyframes is to do it first in large steps - say 20 frames - before fine-tuning. It will ultimately save you a lot of work.

Do you want to know more? Then, in the short movie hit the pause button a lot of times :). That may give you a better idea about the setup. If you want a more detailed explanation per step, you can always contact me via CallTheONE.
-
Camera Mapping Tutorial in Cinema 4D
6 mins read

-
MographToNulls for C4D R20 – Free Download Python Script Tag
4 mins read

-
Strandbeest C4D Leg Rig - Free Download
5 mins read

-
Windows Experts to Support You
3 mins read

-
Questions about Android
4 mins read

-
Ales Zahradkaarchitect and tutorCA$ 0,57 pm
-
Jochem de KlerkCreative missionaryFree
-
Michai Mathieu MorinArt ProductionCA$ 8,60 pm
-
Paola EscandonAnimatorCA$ 0,17 pm
-
Antony BuonomoDesigning, writingCA$ 0,78 pm